


3. Basic Concepts
GIMP allows you to edit and manipulate "bitmap images" such as photographs from a digital camera. A bitmap image can be thought of as a rectangular array of tiny dots, called pixels (so small that they are unnoticed). Each pixel is assigned a colour value. Below on the left we see a small image; on the right it is enlarged, and the individual pixels are visible as small rectangles, each containing a single colour (here generally a shade of orange or grey).
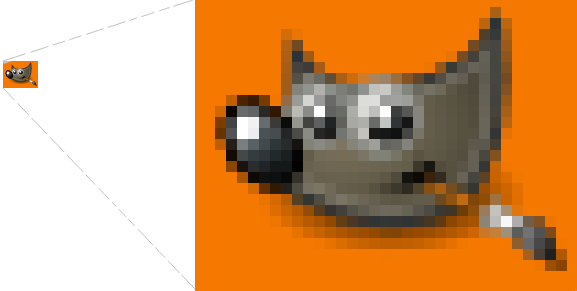
Bitmap images are often stored as JPEG or TIFF files, for example as "myphoto.jpg".
Bitmaps are sometimes called "raster graphics". An alternative image format called "vector graphics" is more suitable for line drawings than photos. GIMP can open but not save this format. A good open source vector graphics editor is Inkscape.
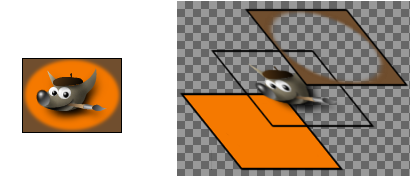
GIMP allows an image to be represented as a number of "layers", to make editing easier. Layers can be thought of as a stack of glass sheets, each a bitmap; you view the final image from the top of the stack. The transparency of pixels in each layer can be set, to allow lower layers to be partially seen through coloured regions in a layer above.
Here we see an image on the left which is constructed from the 3 layers shown on the right.
You can select which layer or combination of layers you wish to see and edit.
See more: Layers.
We've seen that each pixel has a single colour. A colour can be represented in different ways. Most often GIMP uses the colour mode "RGB" (Red, Green, Blue) to represent colour. For example, a purple colour is made from a bit of red and a bit of blue. In RGB colour mode each colour is represented by three numbers, to specify the strengths of the red, green and blue components of that colour. Thus each pixel on a layer has 3 numbers to specify its colour.
Each image has a single colour mode, which is set on creation, or can be changed from the menu. GIMP's three colour modes are "RGB" (as above), "Grayscale" and "Indexed".
In "Grayscale" mode, each pixel is a shade of grey. The darkest shade of grey is black, and the lightest is white, and there are many possible shades in between. Each shade of grey is represented by a single number, to specify its darkness or lightness.
The third colour mode, "Indexed", is described later.
The components that made up a colour are called "channels". For example in RGB colour mode there is a red, a green and a blue channel. In the grayscale mode there is a single channel representing the shade of gray. GIMP allows you to see and edit a chosen single channel or a combination of channels for the active layer(s).
Below, the full image is on the left; the red, green and blue channels are shown on the right. The full image background starts as pure red in the top left corner, turning to pure blue in the bottom right. The red channel has no colour in the bottom right (where the full image has pure blue), the blue channel has no colour in the top left - and the green channel has no background colour at all (ie it is shown black), because the image background is made from red and blue only.

In addition to the channels used to represent colour, there may optionally be a single "Alpha" channel, which represents the degree of opacity of the paint (be it red, green, blue, grey). Thus each pixel on a layer may have a number to specify how transparent or otherwise the paint colour in that pixel is.
See more: Colour Modes and Channels.

Often when modifying an image, you want only a part of the image to be affected. The "selection" mechanism makes this possible. Each image has its own selection, which you normally see as a moving dashed line separating the selected parts from the unselected parts (the so-called "marching ants" ). Actually this is a bit misleading: selection in GIMP is graded, not all-or-nothing, and in fact the selection is represented by a full-fledged grayscale channel. The dashed line that you normally see is simply a contour line at the 50%-selected level.
A large component of learning how to use GIMP effectively is acquiring the art of making good selections — selections that contain exactly what you need and nothing more. Because selection-handling is so centrally important, GIMP provides many tools, accessible from the Toolbox and the menu. You can also "paint the selection" on the "Quick Mask" or create "Selection Masks" to save and manipulate selections. Both these "masks" appear as extra channels on the channel dialog.
See more: Selections.
When you make mistakes, you can undo them. Nearly everything you can do to an image is undoable. In fact, you can usually undo a substantial number of the most recent things you did, if you decide that they were misguided. GIMP makes this possible by keeping a history of your actions. This history consumes memory, though, so undoability is not infinite. Some actions use very little undo memory, so that you can do dozens of them before the earliest ones are deleted from this history; other types of actions require massive amounts of undo memory. You can configure the amount of memory GIMP allows for the undo history of each image, but in any situation, you should always be able to undo at least your 2-3 most recent actions. (The most important action that is not undoable is closing an image. For this reason, GIMP asks you to confirm that you really want to close the image if you have made any changes to it.)
Many, probably most, of the things that you do to an image in GIMP are done by the GIMP application itself. However, GIMP also makes extensive use of "plug-ins", which are external programs that interact very closely with GIMP, and are capable of manipulating images and other GIMP objects in very sophisticated ways. Many important plug-ins are bundled with GIMP, and many more are available elsewhere.
All of the commands in the Filters menu, and a substantial number of commands in other menus, are actually implemented as plug-ins.
See more: Plugins.
In addition to plug-ins, which are programs written in the C language, GIMP can also make use of scripts. The largest number of existing scripts are written in a language called Script-Fu, which is unique to GIMP. It is also possible to write GIMP scripts in Python or Perl. These languages are more flexible and powerful than Script-Fu; their disadvantage is that they depend on software that does not automatically come packaged with GIMP, so they are not guaranteed to work correctly in every GIMP installation.
See more: Scripting.